Nix Test Sheet Guide
This guide will walk you through the proper procedure for using the Nix Test Sheet V3.x
The test sheet will allow you to benchmark your device for the following:
- Inter-instrument agreement (Consistency between two of the same device models)
- Repeatability (Consistency of the same device used multiple times)
- Intra-instrument agreement (Consistency between two different device models)
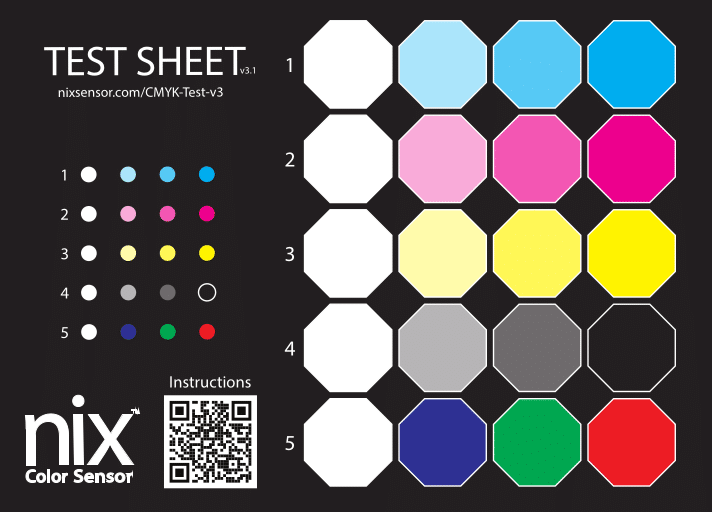
For use with: Nix Pro 2, Nix Mini 2/3, Nix Spectro 2 (5mm), Nix Spectro 2 (2mm) devices
A high-quality, printed copy of this test sheet can be obtained from Nix by emailing info@nixsensor.com.
Note: Do not attempt to print, photocopy or create your own test sheet. This will drastically and negatively affect your results.
Step 1: Download and Install the Nix Toolkit App
- Download and install the latest version of the Nix Toolkit App for your mobile device.
Step 2: Download the data collection template

- Download and open the latest data collection template and open it in excel.
Note: You must enable macros in Excel for the automated Delta E calculations to function correctly.
Step 3: Connect your device
- If your device is new, please wake it up by plugging it into a charger.
- If the device has not previously been charged, please fully charge it at least 30 mins before scanning.
- Connect to your device by pressing the diamond in the upper right corner of the Nix Toolkit App and selecting your device from the list (sorted by Signal Strength ~ distance)
Note: The connection routine might be slightly different depending the device being connected. Please see your specific device user manual for more information.
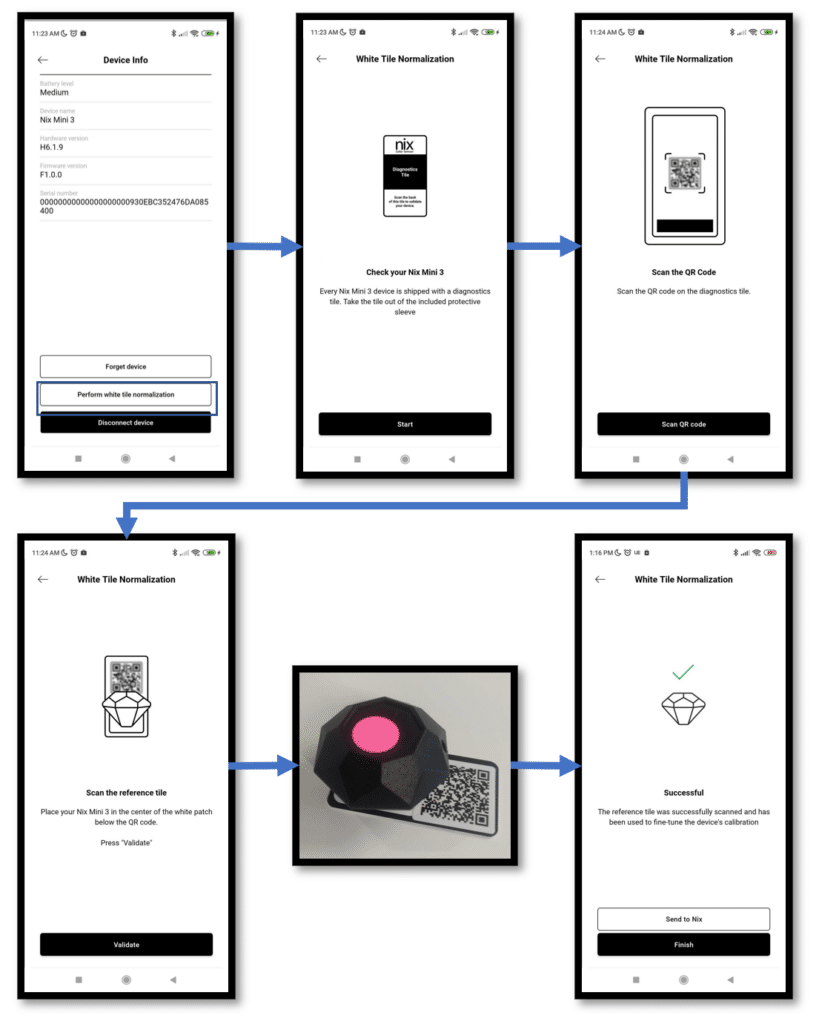
Step 4: (Optional) White Tile Normalization
- The next step is the optional White Tile Normalization. Start by pressing the device connection diamond in the top right again. Press Perform white tile normalization
- Follow the on-screen instructions to normalize your device
Note: Recommended only if device performance appears to be lower than expected
Note: These steps may be slightly different depending on the device being used to test. Please consult your particular device’s user manual for specific instructions.
Step 5: Start Scanning
- In the app, go back to the main screen and navigate to Scan for Digital Values.
- Ensure your device settings are correct. We recommend: D50/2°/M2
- Make sure the CMYK test sheet is placed on a flat white surface (ex. a desk).
- Place the device on the desired patch, making sure it’s seated level and in the center of the patch.
- If using the 2mm Adapter Version, make sure the device is placed in the positioning adapter correctly before taking a measurement.
- Press the Scan with Nix button to measure the patch.
Note: The small circular patches are 4mm in diameter and are to be only used by the Nix Spectro 2 – 2mm Version
Note: The larger octagons are 20mm in diameter and should be used for the evaluation of Nix Mini, Nix Pro, and Nix Spectro devices.
Note: For best results in comparison between device types or models, ensure you are scanning the exact middle of each test patch.
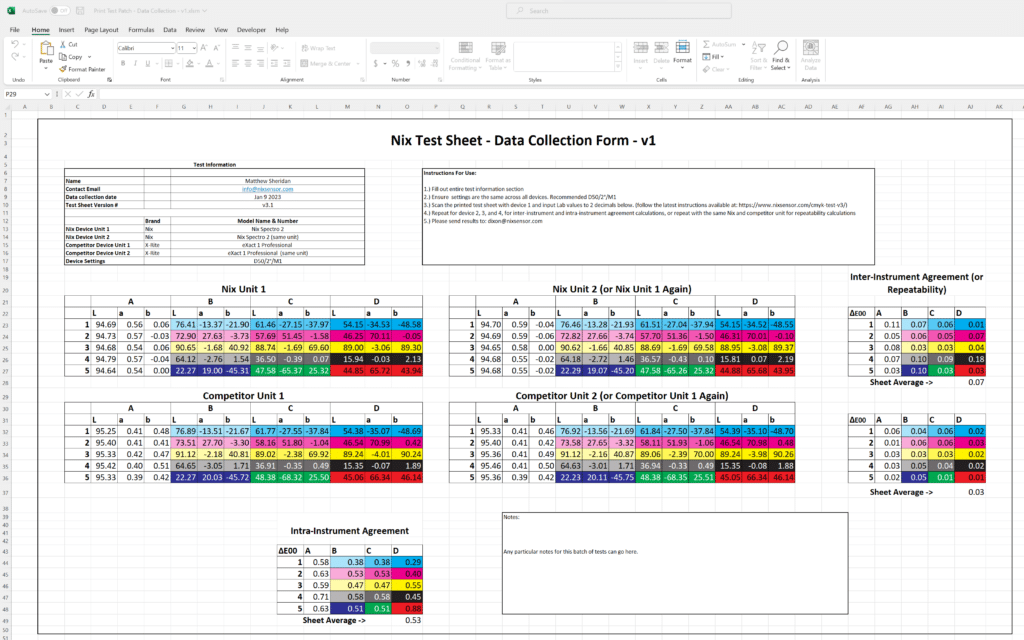
Step 6: Fill out and Submit your data collection spreadsheet
- Fully fill out the “Test Information” section of the downloaded excel sheet.
- Record your CIELAB values in the correct cell in the downloaded excel sheet.
- Repeat steps above for all patches, and all devices.
- When completed, save your excel template and email to your Nix representative.
Note: If comparing between devices, or between brands of devices, please ensure all settings and modes are exactly the same. ex. all devices in D50/2°/M1