User Manual
Nix QC
Product Mission
It might seem obvious, but every object in the world has a color.
If you’re in the business of researching, manufacturing, producing, inventing, purchasing, or distributing these objects, at some point you must consider a color quality control solution. In the past, this has typically meant either expensive and difficult to use lab equipment, or analog swatches, inspected by eye.
Our goal with the Nix Quality Control Color Sensor (Nix QC) was to hit the elusive sweet spot of highly accurate and innovative technology that’s also extremely easy to use, and in turn provides a high level of color confidence.
To do this we had to build not just a tool, but a system of hardware, software, and adapters that could easily be reconfigured to fit the demanding needs of your particular workflow.
The product that you hold in your hands today is the culmination of years of hard work from a dedicated team of professionals at our home base in Hamilton, Ontario, Canada. We will always push the boundaries and we will always keep innovating to make your life easier, so be sure to keep
your software updated for the latest and greatest features.
On behalf of the entire Nix team I hope that you enjoy your purchase and that it will help you to bring excellence in color quality control to your workplace.
Sincerely,
Matthew Sheridan
CEO and Founder of Nix Sensor Ltd.
Industry Uses
The Nix Quality Control Color Sensor (Nix QC) is capable of seamlessly fitting into the work flow of any industry. This is because of the Nix QC’s unique ability to measure the color of almost any product – whether it be a solid, liquid, powder, or gel (some materials may require adapters).
A look at some of the materials scanned by the Nix QC…
Liquids
Liquid/Powder adapter needed
Wines & Beverages
Stains / inks / dyes
Liquid foundation & other makeup
Honey
Blood
Cleaning solutions / chemicals
Powders
Liquid/Powder adapter needed
Spices
Soil
Coffee
Pigments
Concrete
Grains
Solids
Plastics
Metal
Paper / pulp
Wood
Vinyl
Rock / stone / brick
Textured & Soft Surfaces
Flat adapter may be needed
Fabrics
Carpeting
Skin
Food products
Agricultural products
Fur / feathers
Are you using the Nix QC on liquids, powders, gels, or textured and soft surfaces? You may need special adapters to help get accurate readings.
Have you heard the Nix QC has been used to test various materials and has added value to the workflow across a variety of fields?
Contents
- Industrial Carrying Case
- Reference Tile
- Cleaning Spray
- Micro USB Charging Cable
- Nix Lanyard
- Microfiber Cloth
- Microfiber Carrying Pouch
- Nix Quality Control Color Sensor
- Manual
- Inspection Certificate
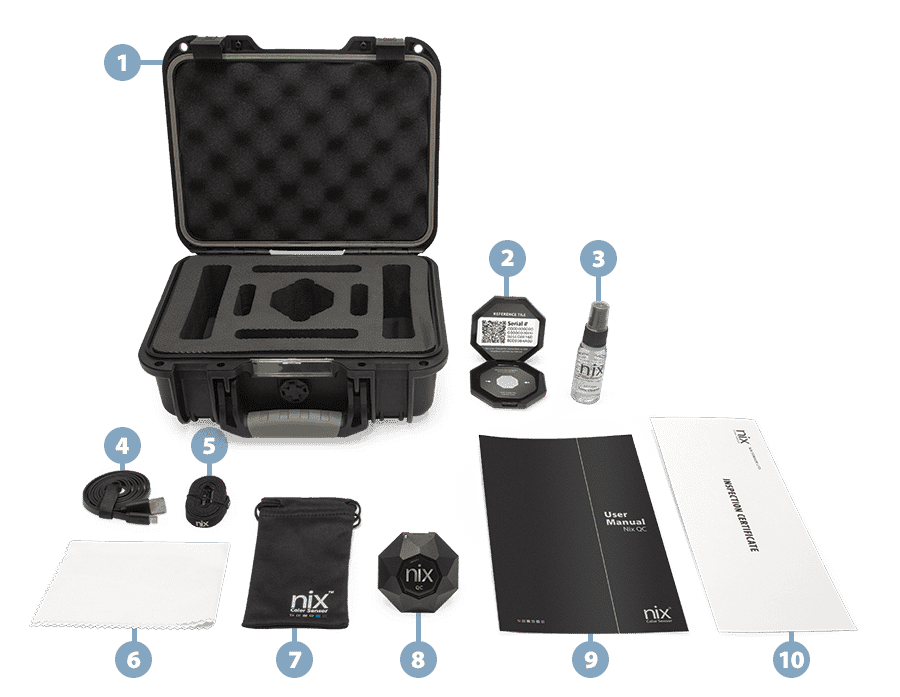
Diagram of Parts
Downloading the App
The Nix QC hardware requires the installation of the Nix QC App, compatible with Android and iOS.
Nix QC App
Compatible with iOS (11.0 or newer) or Android (4.4 Kit Kat or newer)
With the Nix QC app, you can control and monitor the variance of color in your studied samples. Visualize color deviation between your scanned samples using the color space target zone and identify the direction in which your sample differs from the reference by lightness and hue. For example, learn if a sample contains more yellow than your reference, or if it is darker or lighter. If a sampled color doesn’t meet your set threshold, the scan will be flagged and logged so it can later be referenced. Custom quality control libraries can be imported, and QC thresholds can be set by managers. The color difference (Delta E or ΔE) value to the reference color can be seen for all scans in the sample set.
- Results displayed in CIELAB and compared to reference color
- Log of scans in comparison to the reference sample
- Set custom pass/fail color difference (ΔE) thresholds for sampled colors
- Multiple color difference (ΔE) modes available, including CIE76, CIE94, CIE2000, and CMC
- Multiple illuminant and observer scan settings (D50, 2° and D65, 10°)
- Set multi-point averaging
- Import custom libraries and export scan data (click here for details and instructions)
- Allows the user to verify that the Nix QC device is performing within advertised specifications using the provided reference tile
The Nix QC hardware is also compatible with the Nix Toolkit, Nix Paints, and Nix Pro Color Sensor apps.
Turning On & Charging your Device
The Nix QC arrives in a “sleep” state. To wake it up, plug in the provided micro USB charging cable into the USB port on the device (plug the other end into a wall adapter or PC). Once charging, a small blue LED will illuminate on the left side of the USB port on the Nix QC to indicate it’s connected to power. For a full charge, keep your device plugged in for four hours.
You can check the battery level of your device by connecting to the Nix QC app. Select the slider icon ![]()
A low battery icon ![]()
Note: The Nix QC does not need to be turned off. It will automatically hibernate when the Nix QC app is closed.

Device Set-Up
Connecting to wirelessly
Before attempting to connect to your Nix QC, be sure the device has been woken up and has a charge (see page 13). On your Android/iOS smartphone or tablet, ensure wireless connectivity is enabled in your settings. Open the Nix QC app. The app may request to access your location (this is necessary for wireless connectivity), accept the request.
Place your Nix QC next to your smartphone or tablet. Press the inactive wireless connection icon ![]()
![]() when connected.
when connected.
Setting the Delta E and Scan Settings
The default Delta E type is CIE2000 and default scan settings are D50, 2°, but these can be customized for your needs. Select the slider icon ![]()
- Illuminant & Observer
- Delta E Type
- Delta E Threshold
Remember: Every time the settings are adjusted your new scan logs will be recorded in a new batch and previous scans will be cleared from the plot. To access your data, click on the history icon ![]()
Using the Reference Tile
You will periodically be required to confirm that the Nix QC is within advertised specifications. The app may request access to your camera to scan the QR code accompanying the reference tile (used for the verification process), accept the request.
The app will remind you to verify your Nix QC device by displaying a warning icon ![]() at the top left of the screen. Press the icon to start the process. Remember to remove any adapters you may have attached to the Nix QC. Follow the instructions on the app, which will confirm whether or not the device is calibrated to the factory settings.
at the top left of the screen. Press the icon to start the process. Remember to remove any adapters you may have attached to the Nix QC. Follow the instructions on the app, which will confirm whether or not the device is calibrated to the factory settings.
If you neglect to perform this step when the warning icon is present, each scan will be flagged as being out of spec. You can verify your device at any time within the settings (slider icon ![]()
See below for instructions on cleaning the reference tile.
Remember: Always close the reference tile container and store in the included carrying case to prevent dirt or dust buildup which can impact future measurements.
Proper Scanning Technique
Place your Nix QC flat on any solid, opaque surface and start scanning. Remember to keep the device flush with the surface to block out all ambient light for the most accurate results.

Are you using the Nix QC on liquids, powders, gels, or textured and soft surfaces? You may need special adapters to help get accurate readings.
Proper Care & Cleaning
To prevent dust buildup and other damage, always store the Nix QC in the provided Industrial Carrying Case.
Dust can be removed by gently wiping the device with the provided microfiber cloth. To thoroughly clean the Nix QC body, lens, or LEDs, spray the provided cleaning solution onto the cloth and gently wipe down the device (never spray the device directly).
If your reference tile requires cleaning, wipe it with a dry microfiber cloth (provided). Never use any cleaning solution on the tile. Use only the provided cloth, as other materials may be dyed and can stain the reference tile.
Remember: Only use the cleaning solution provided. Avoid other solvents or cleaning products that may degrade the lenses over time.
Recertification
The Nix QC device should be recertified once per year or if the app indicates that the device calibration falls outside of the factory settings.
Due to the sensitivity of the Nix QC and the specialized equipment that is required, the Nix QC must be sent to Nix Sensor Ltd.’s facility in Canada for recertification.
Nix Sensor Ltd. offers a full-service recertification and inspection that includes:
- Recalibration using Nix Sensor Ltd.’s proprietary 24 color array (comprehensive, extended gamut)
- Full inspection of the device
- Cleaning of lenses and LED light pipes
Remember: Recertification services can only be conducted by
Nix Sensor Ltd. Both the Nix QC and reference tile are required for recertification.
Is your device’s calibration falling outside of the factory settings?
Do you have questions about recertification?
LiveChat available below
Email: support@nixsensor.com
Submit a ticket
Business Solutions
At Nix Sensor Ltd. we are all about color and how it applies to your business. We take great pride in leading the industry with affordable, accurate, and revolutionary color measurement systems that are improving businesses around the world. We can create anything, from simple white-labeled versions of our off the shelf products all the way to brand new, industry disruptive devices. Our dynamic team of innovators have deep technical and industry knowledge, with expertise in:
Hardware
Our engineers have developed many award winning innovative designs that are user friendly, cost-efficient, and consistently deliver industry leading accuracy.
Software
A dedicated team leader from our Software Team will work with you to ensure your project is completed within your timeline and budget.
Color Consultation
We live and breathe color. We can offer our professional color advice, help you become more efficient, cost effective, and diagnose problems before they occur.
Color Solutions
There’s not always going to be a “one-size-fits-all” solution to color problems. We will work with you to develop a system that best fits your needs.
Have some questions for our solutions team?
LiveChat available below
Email: support@nixsensor.com
Submit a ticket
Specifications
| Size | 6.0 x 6.0 x 4.3 cm |
| Weight | 50 g |
| Measurement interface | Blocks all ambient light |
| Plastic enclosure | 2 mm thick polycarbonate ABS blend |
| Other physical attributes | Heat-staked; ultraonsically welded; no moving parts |
| Carrying case attributes | Water resistant; portable; durable; field-tested |
| Inter-instrument agreement | Average ΔE (CIE2000) < 0.30, maximum ΔE (CIE2000) < 0.75 (both D50, 2° & D65, 10°) to master unit on 24 reference tiles at a temperature of 23 °C |
| Short-term repeatability | ΔE (CIE2000) < 0.10 (both D50, 2° & D65, 10°) to mean of 10 scans taken every 5 seconds on included white reference tile at a temperature of 23 °C |
| Calibration/validation | On an array of proprietary 24 colored tiles at Nix Sensor Ltd.'s facility (comprehensive, extended gamut) |
| Spectral range | 380-730 nm |
| Measurement geometry | 45°/0° |
| Measurement aperture | 14 mm diameter |
| Light source | 2x 5000K and 2x 6500K High-CRI LEDs designed specifically for color reproduction |
| Temperature Range | 5 °C - 35 °C |
| Humidity Range | 0% - 80% non-condensing |
| Time per scan | < 2.5 seconds |
| Wireless connectivity | Local connection, range 20 m line of sight |
| Charging interface | Micro USB 2.0 |
| Charge time | 4 hours |
| Battery size | 25,000 scans before recharge; 500 mAh |
| Light source estimated lifespan | 1,000,000+ scans |
Warranty
Nix Sensor Ltd. 1 Year Limited Warranty
Who is covered by this warranty?
Nix Sensor Ltd. located at 286 Sanford Ave North, Suite 501, Hamilton, Ontario, Canada, L8L 6A1 (“Nix”) extends this limited warranty only to the original purchaser of the product warranted under this warranty. (the original purchaser, “you” or “your”). This warranty cannot be transferred or sold.
What does this warranty cover?
This limited warranty covers manufacturing defects in materials and workmanship of your Nix product (the “product”) for the Warranty Period defined below.
What does this warranty not cover?
This limited warranty does not cover any damage caused by: (1) transportation or storage of the product; (2) improper use of the product; (3) failure to follow the product instructions; (4) modifications to the product; (5) unauthorized repair of the product; (6) normal wear and tear; or (7) external causes such as accidents, abuse, unusual physical or electrical stress, or other actions or events beyond Nix’s reasonable control.
Unauthorized dismantling or servicing of the equipment will void all warranty claims.
This limited warranty also does not cover disposable items, or parts or components of the product that are inherently subject to deterioration during the normal operation of the product, such as batteries, adapters, USB cables, carrying pouches, reference tiles, cleaning equipment or carrying cases.
This limited warranty does not cover changes in product or system accuracy over time. The product is guaranteed to meet the specifications outlined in the product’s specifications at the time of manufacturing but afterwards it is your responsibility to regularly check the product or system accuracy for drift or changes.
This limited warranty only covers products purchased directly from Nix or directly from sellers authorized by Nix. You may obtain a current list of authorized Nix sellers by calling +1 (905) 581-6363 or emailing Nix’s customer service department at support@nixsensor.com. Proof of purchase from an authorized seller is required for warranty coverage.
What is the period of coverage?
This limited warranty starts on the date the product is delivered to the original purchaser and lasts for 1 year (that 1 year period, the “Warranty Period”). The Warranty Period is not extended if Nix repairs the product, but if Nix replaces the product a new Warranty Period will apply to that replaced product starting on the date the replaced product is delivered to you. Nix may change the availability of this limited warranty at Nix’s discretion, but any changes will not be retroactive.
What are the remedies under this warranty?
With respect to any defective product for which Nix has been notified of the defect during the Warranty Period, Nix will, at Nix’s discretion, either (1) repair or replace that product (or the defective part) free of charge or (2) refund the purchase price of that product. Nix will also pay for shipping and handling fees to return the repaired or replacement product to you if Nix elects to repair or replace the defective product. The remedies described above are Nix’s entire liability and your sole remedy for breaches of this limited warranty.
In no event will Nix Sensor Ltd. be liable for any of buyer’s manufacturing costs, overhead, lost profits, goodwill, other expenses or any indirect, special, incidental or consequential damages based upon breach of any warranty, breach of contract, negligence, strict tort, or any other legal theory. In any event of liability, Nix Sensor Ltd.’s maximum liability hereunder will not exceed the price of the goods or services furnished by Nix Sensor Ltd. giving rise to the claim.
How do you obtain warranty service?
To obtain warranty service, you must call +1 (905) 581-6363 or submit a support ticket to Nix’s Customer Service Department before the end of the Warranty Period to obtain a Return Merchandise Authorization (“RMA”) number and a prepaid return shipping label. No warranty service will be provided without an RMA number. You are responsible for printing out and affixing the prepaid shipping label to the outside of your return shipment, and your return shipment must be postmarked no later than the last day of the Warranty Period.